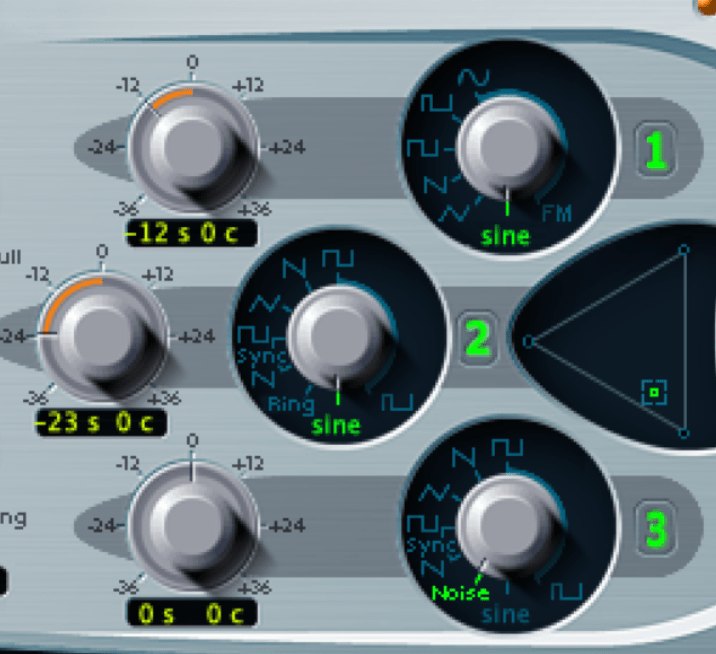
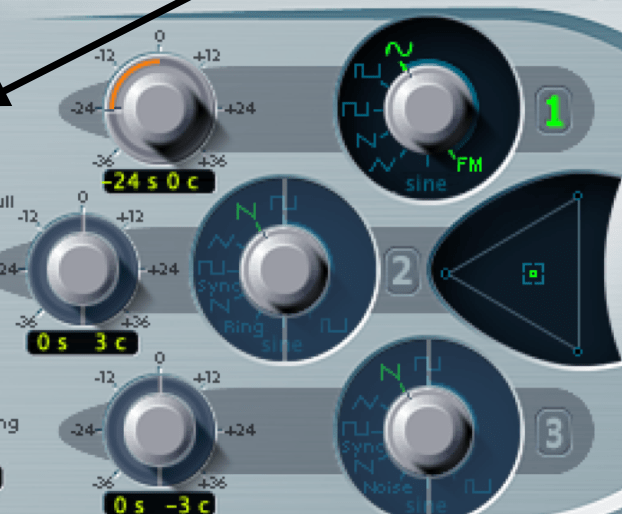
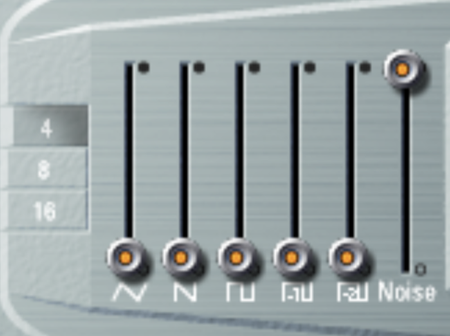
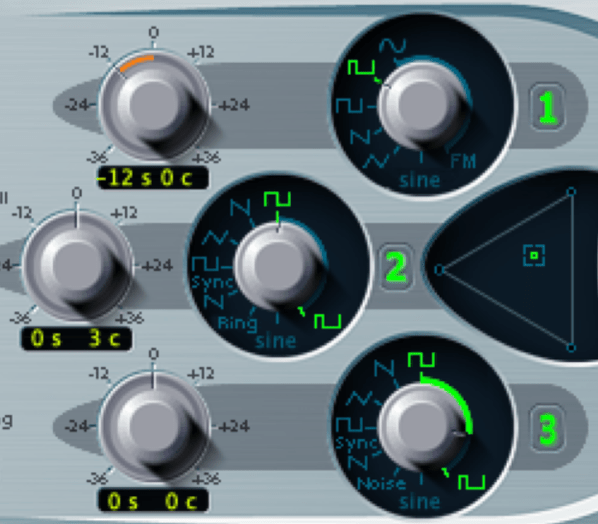
Oscillators (Osc)
• Set Osc 1 and 2 to Sine Wave
• Adjust Osc 1 down an octave (-12s)
• Adjust Osc 2 down 2 octaves (-24s)
• Set Osc 3 to noise
• Adjust mix of all 3 in triangle as desired
To meet the synthesis mark scheme, you are required to design your own sounds and manipulate using automation and application of the LFO, filter (cut off/ resonance), envelopes (ADSR); mapping envelopes
1. Pitchy attack synth (ADSR envelope mapped to pitch sine waves/noise)
2. Sine Wave Chord Synth (ADSR mapped to pitch for glide into each chord/note)
3. White Noise with Side Chain compression (automate cut off filter)
4. Square Wave BASS synth (automate cut off filter)
5. Pad synth (with LFO creating tremolo effect)
6. Pluck Synth (automate mapping level with mapped ADSR and tape delay)
7. Arpeggiator synth (automate filter open and close)
8. LFO synth (LFO mapped to filter)
9. Vocoder (also falls under creative FX)
ES2 - Preset 'Analog Saw Init'
Oscillators (Osc)
• Set Osc 1 and 2 to Sine Wave
• Adjust Osc 1 down an octave (-12s)
• Adjust Osc 2 down 2 octaves (-24s)
• Set Osc 3 to noise
• Adjust mix of all 3 in triangle as desired
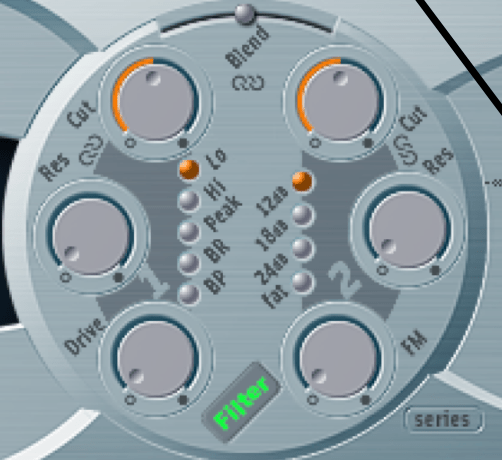
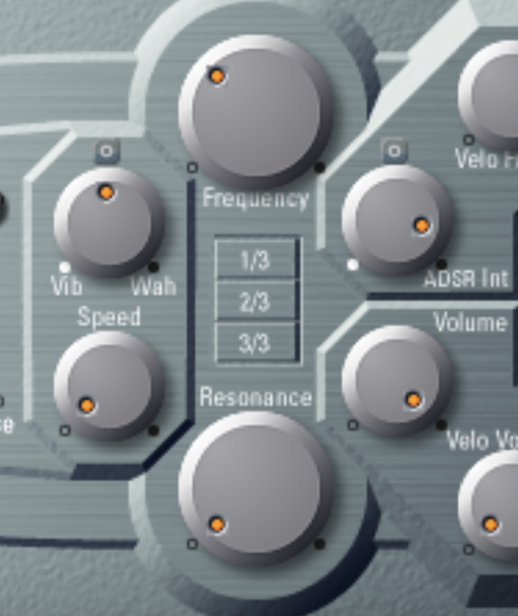
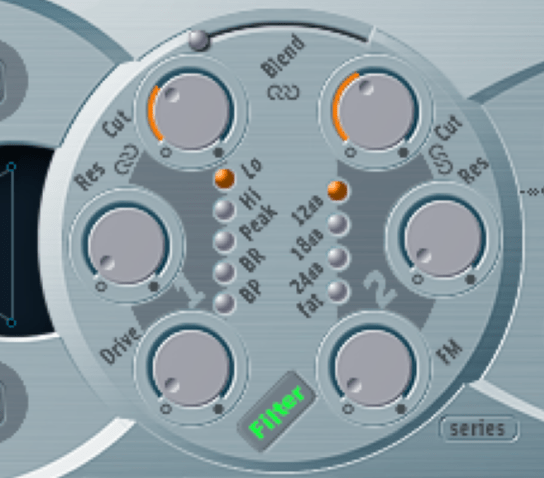
Filters
• Set Cut Offs to just over 50%
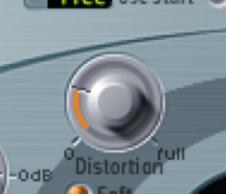
Amplitude (Amp)
• Set Sine and level and distortion approx 9pm%
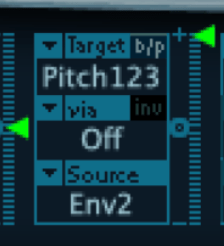
Modulator Mapping (Matrix Routing)
• Use router 4
• Source as Envelope 2
• Target as Pitch 123
• Adjust level to full (green triangle)
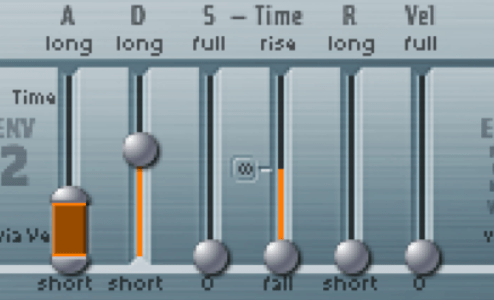
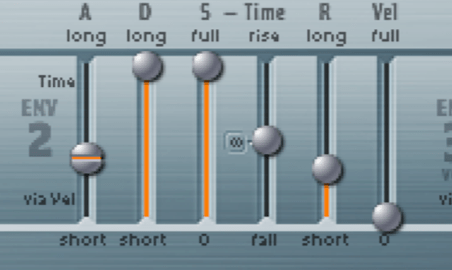
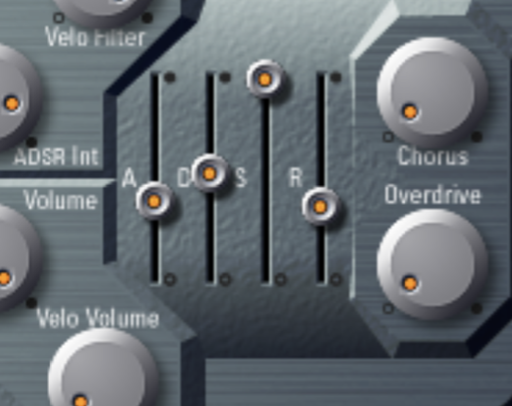
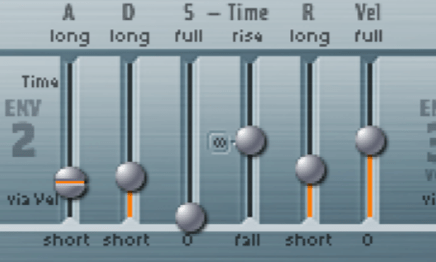
Envelope
• Bring Sustain, Time, Release to 0 ms
• Adjust Decay to 1200ms
• Open Attack to 60ms
Mix/Effects
• Automate Panning Left to Right
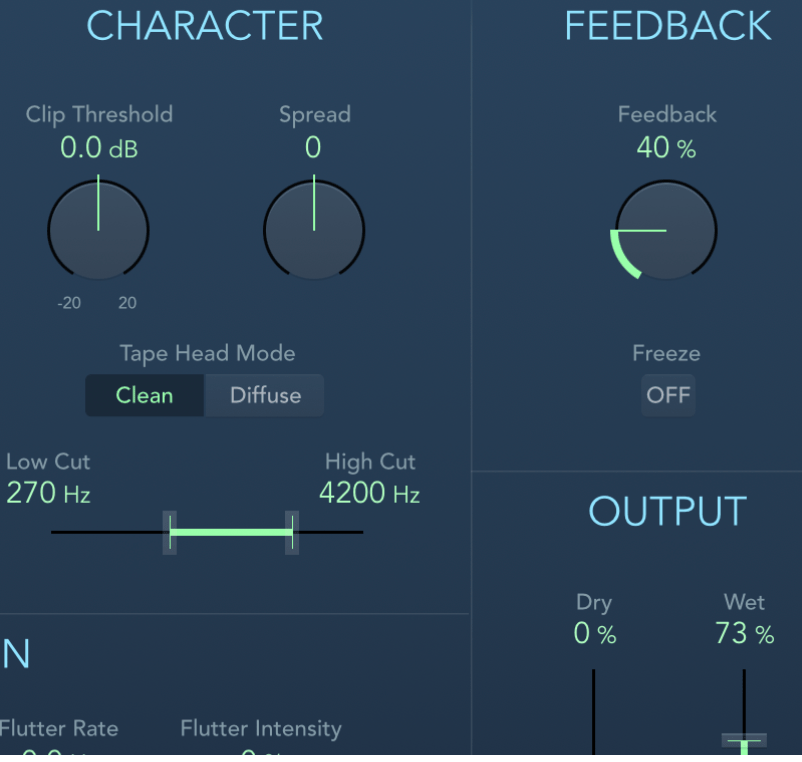
• Using a bus, set up Tape Delay (Use default set to 1/4 note)
• Adjust feedback 40%
• Wet 70%
• Cut lows and highs
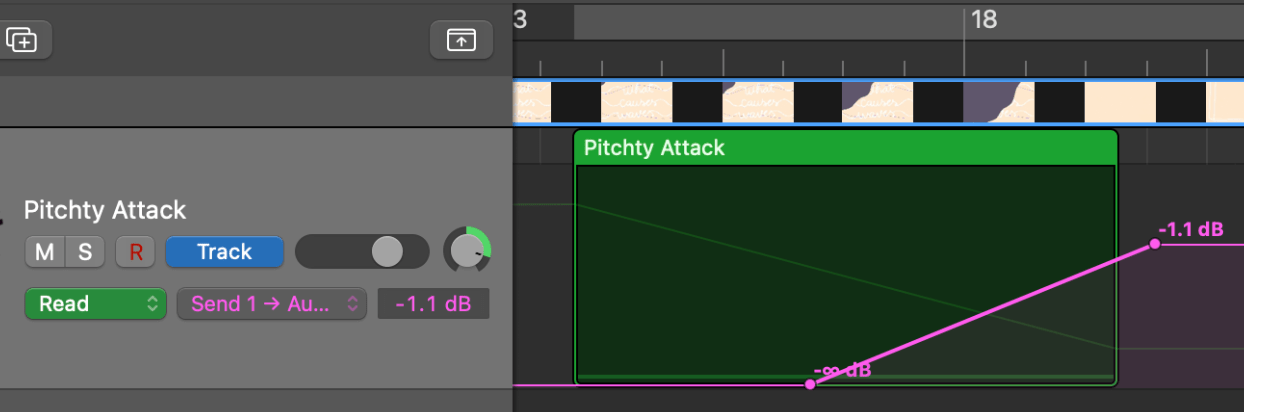
• Automate volume of send level so the delay occurs as the sound is ending. 60 marks 0:33 Tape Delay settings Bus Automation (Press A)
To reflect this action, using ES2 synth, I combined 2 sine waves an octave apart and a noise generator, with the cuff off set to 50%. I mapped the Envelope modulator to the 3 oscillators then adjusted the attack to 60ms and decay to 1.2 seconds, I created a pitch dive effect across 2 octaves resulting in a sweeping sound.
The noise oscillator contributes to the sound of a wave crashing.
Automating the synth L-R in the mix and applying tape delay helps convey movement of a wave enhanced by the pulsating delay sound on 1/4 notes.
Under the mark scheme, original sound design has been created by mapping an envelope and adjusting the AD of envelope to intentionally create a pitch dive/bomb effect.
Creative FX involves automating the volume of the bus and adjusting the tape delay settings.
This meets the brief requirements by reflecting action through wave sounds.
ES2 - Default
Oscillators
• Turn off 2 and 3
• Set 1 to pure Sine Wave
• Detune Osc 1 -24 (semitones)
(Detune important for pitch ramp)
Filter
• Cut offs both 12pm
• Blend to middle
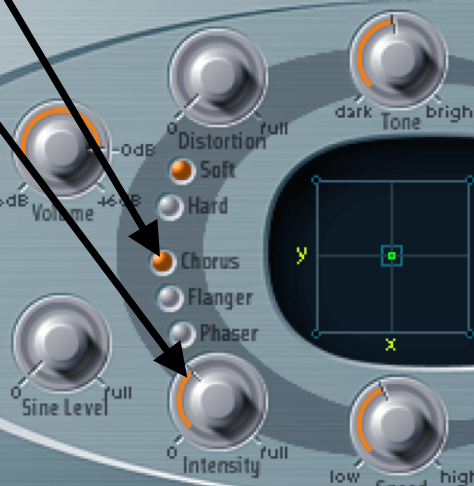
Additional Adjustments
• Turn on Unison (Top of synth)
• Change Voices to 8 (gives wider sound)
• Bring up Analog to 12pm, top left of synth (adds classic warmth)
• Chorus Selected (gives wider sound)
• Intensity 10pm (gives wider sound)
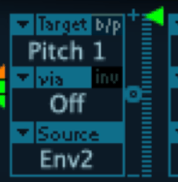
Modulator Mapping
• Router 2
• Source Env 2
• Target Pitch 1
• Green Triangle Level Full
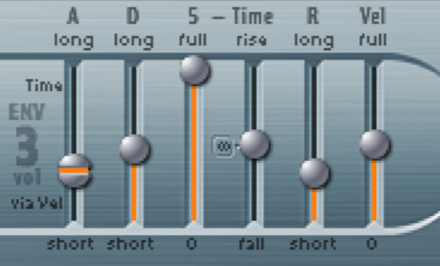
Envelope 2 - ADSR
• Attack approx 260ms
• Decay FULL
• Sustain FULL (keep the note going)
• VEL 0 (important or will sound out of key)
Adjusting the Attack of Env2 should be able to hear/control the initial pitch glide/ramp at the beginning of each chord/note
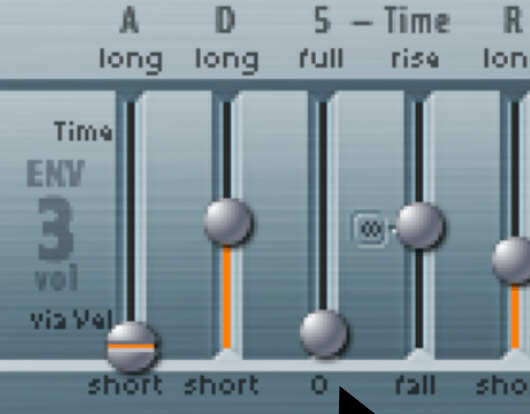
Envelope 3 - ADSR
• Attack approx 160ms
• Decay HALF
• Sustain FULL (keep the note going)
ESP - Default
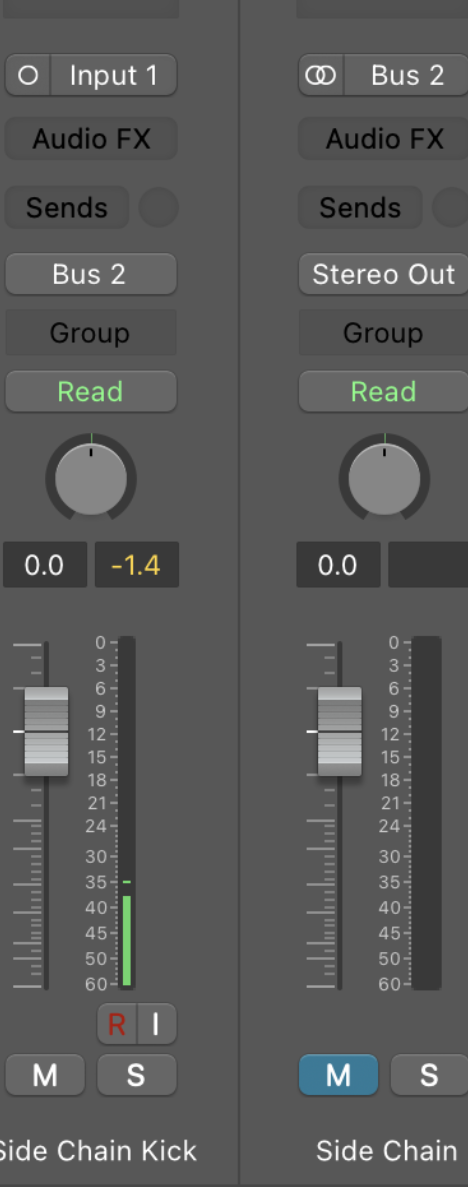
First, set up Side Chain Kick - Pulse
• Create a 4 on the floor kick drum track to last the whole track
• Use either a MIDI Track with drum machine plug-in or an audio sample kick
• Route the output of the track to BUS 10 (Aux)
• Go to BUS 10 (Aux) and Mute the Bus (the kick should be silent)
White Noise Synth
• Load up ESP
• Create a MIDI file and insert one note that will last the whole song from Bar 1
• Note pitch is irrelevant because Noise = every single frequency
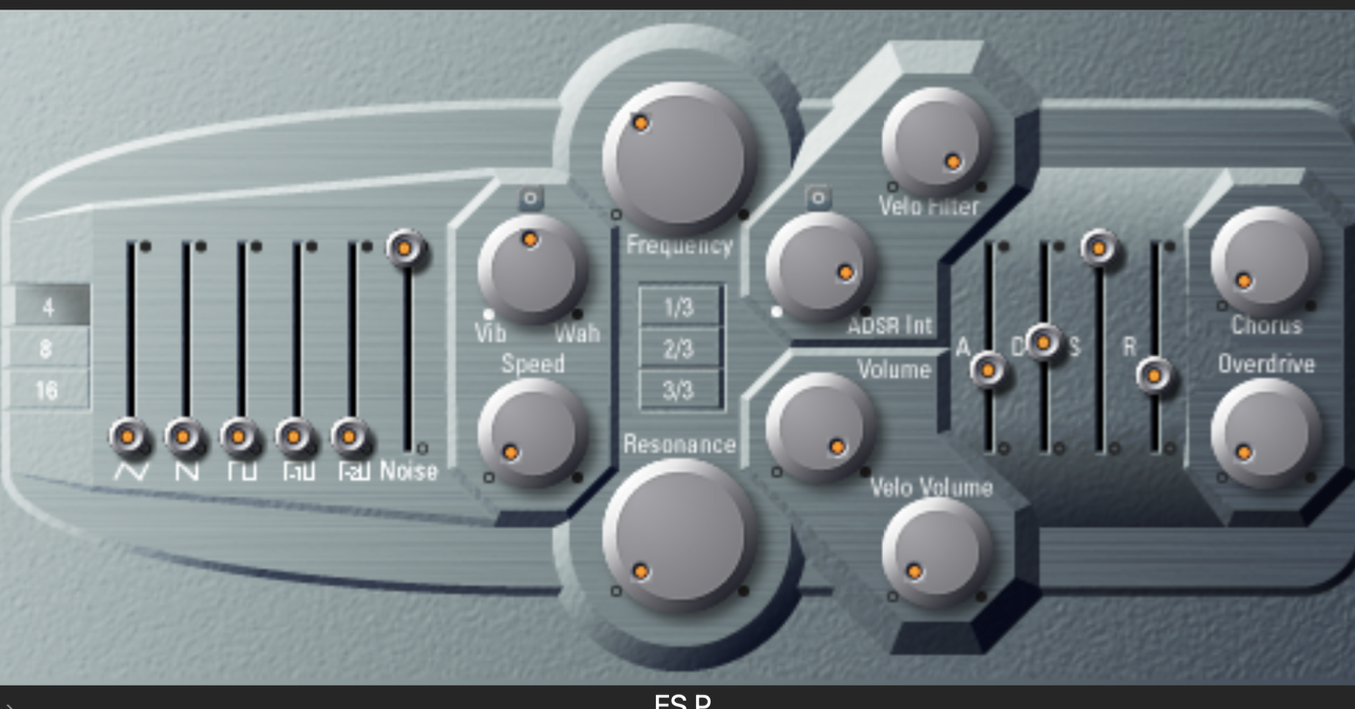
Oscillators
• Attenuate all Oscillators
• Noise generator on full
Filter
• Bring Resonance down to 0s
• Set Cut off about 10pm
Envelope
• Attack approx 45% (so you don’t get a harsh sounding first note)
• Decay at 50%
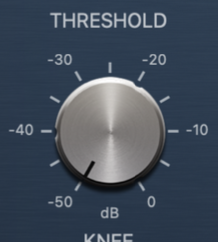
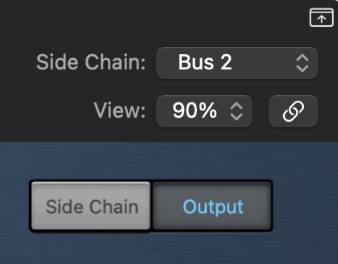
Side Chain Compression
• On White Noise track insert a Compressor
• Set Side Chain to BUS 2
• Bring down Threshold to -50dB
• You can bring up Ratio 2.7:1 but no higher otherwise the output of the compressor will distort/ clip; adjust so the output does not go into the red.
The White Noise Synth should now pulsate in time with the BPM for the whole song.
Automate ESP Filter
• To create sweeping, whooshing wave sounding effect, you need to automate the cut off on ESP
• On sequencer window, Press A for automation
• Select ESP and Cut Off
• Draw in accordingly to reflect the action
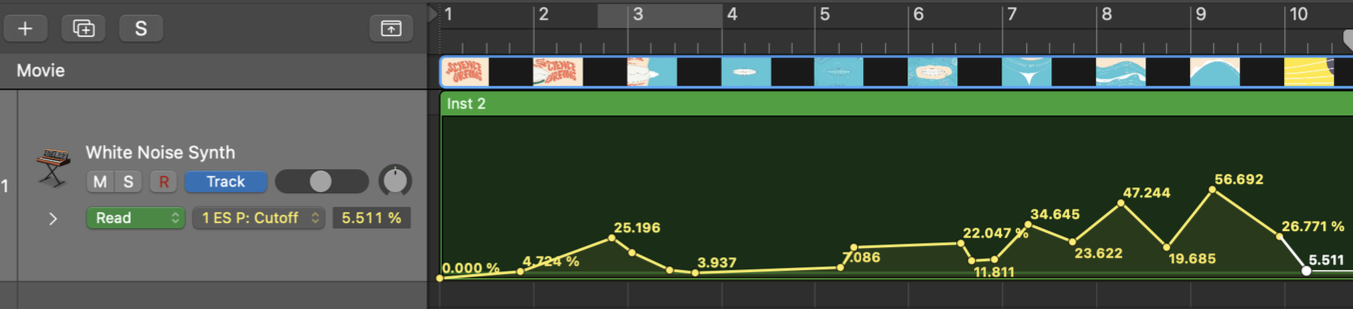
To reflect this action, used Synthesis to design own sound using White Noise, manipulated/automated the filter and ADSR to achieve the sound of waves
For Creative effects, Side Chain kick to create a pulse in time with the song, meeting ‘structure - rhythm’, ‘style and coherence’ and ‘responding to brief’ with the ‘wave effect’
ES2 - Default
Create a simple bass line
Oscillators
• Set all 3 Osc to Square
• Osc 1 = -12s (down 1 octave)
• Osc 2 = 0, 3cents (slightly above)
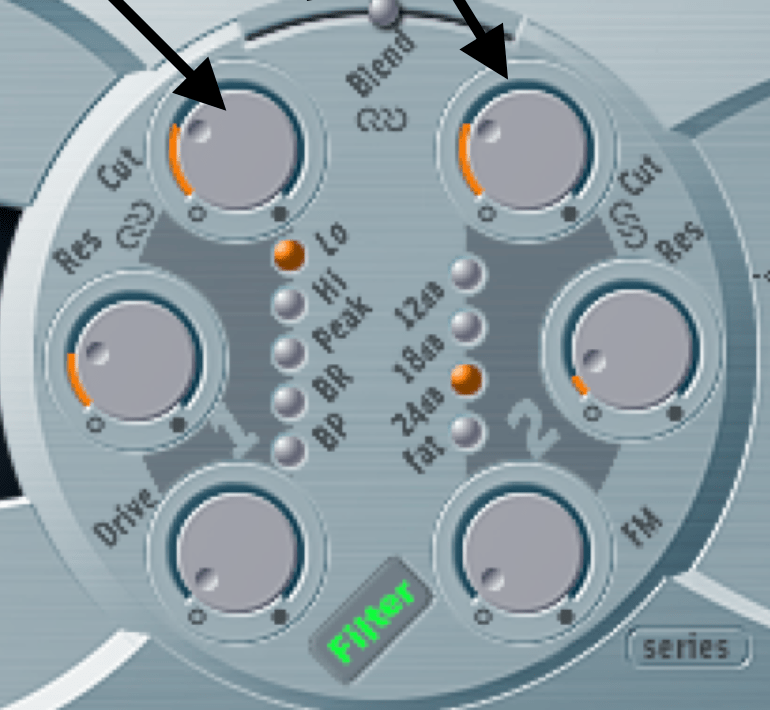
Filter
• Cut off 1 = 10pm
• Cut off 2 = 11pm
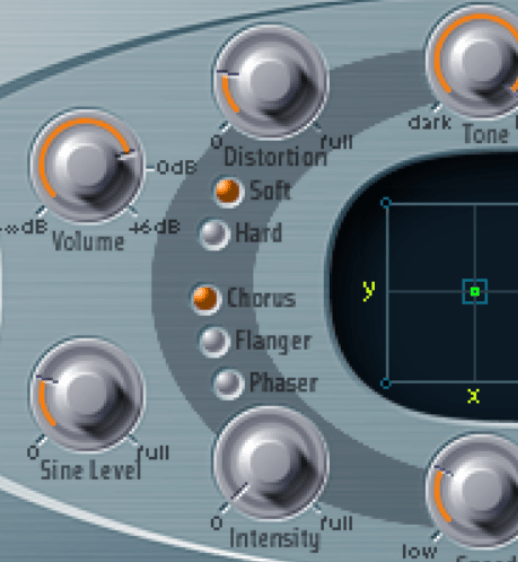
Amplitude
• Distortion = 10pm
Envelope 2
• Attack = 21ms
• Decay = 50ms
• Sustain = 0ms
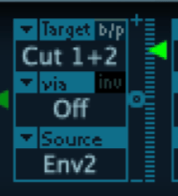
Modulator Mapping
• Use Router 6
• Source = Env 2
• Target = Cut 1+2
• Level = 0.63 (play with this so you can hear how the envelope is affecting the cut off)
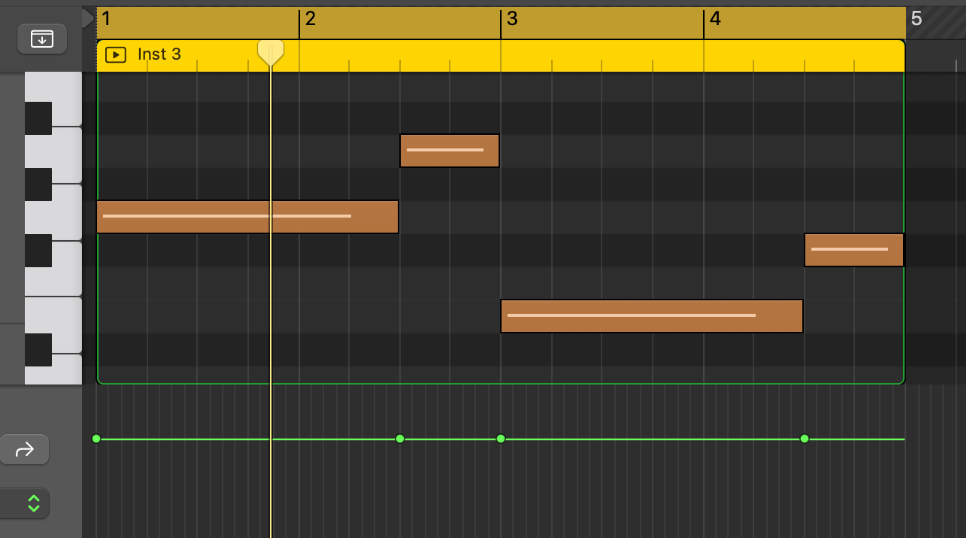
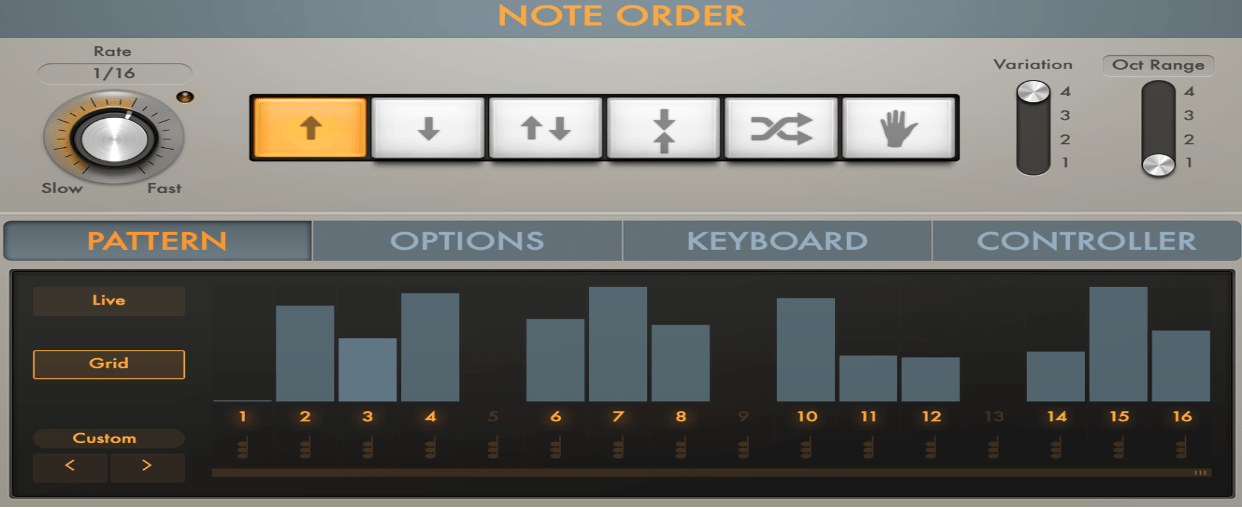
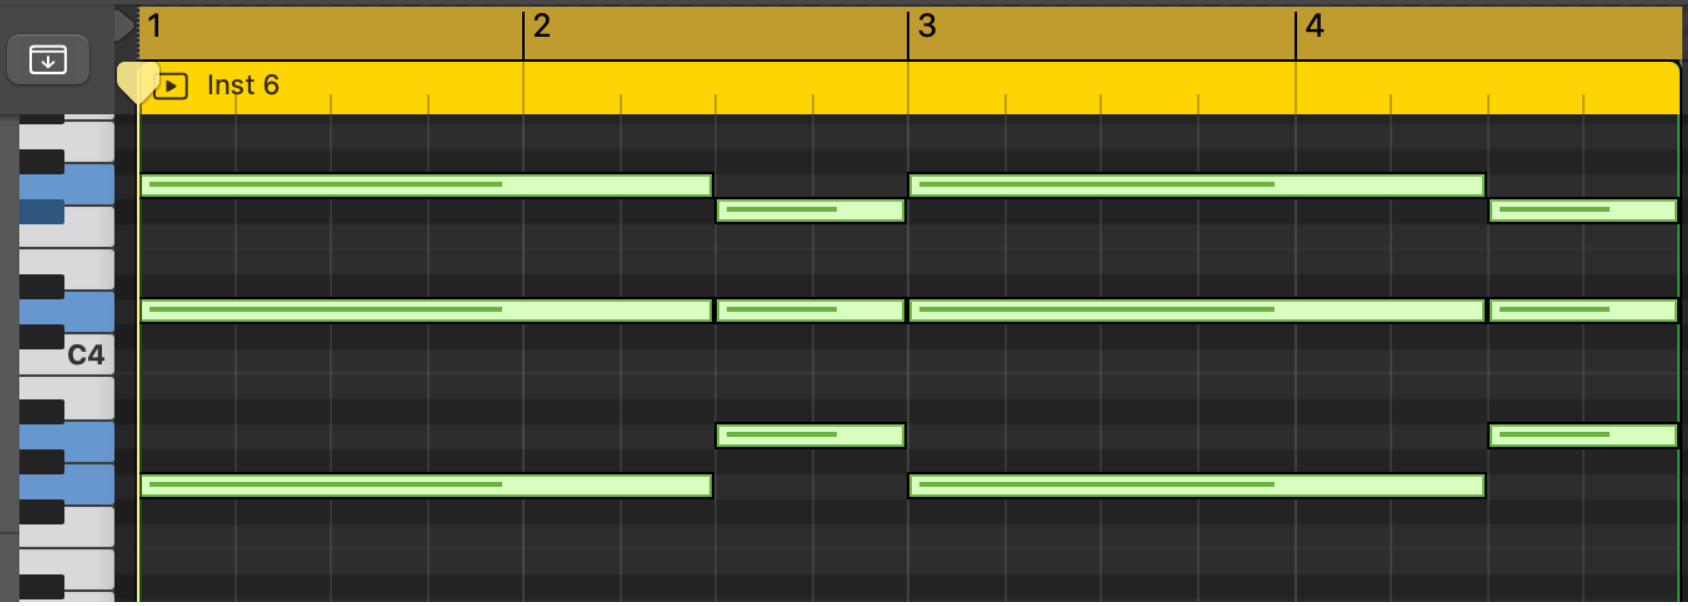
Arpeggiator
• On the channel strip, Insert Arpeggiator under MIDI effects
• Bottom left, change from Live to Grid
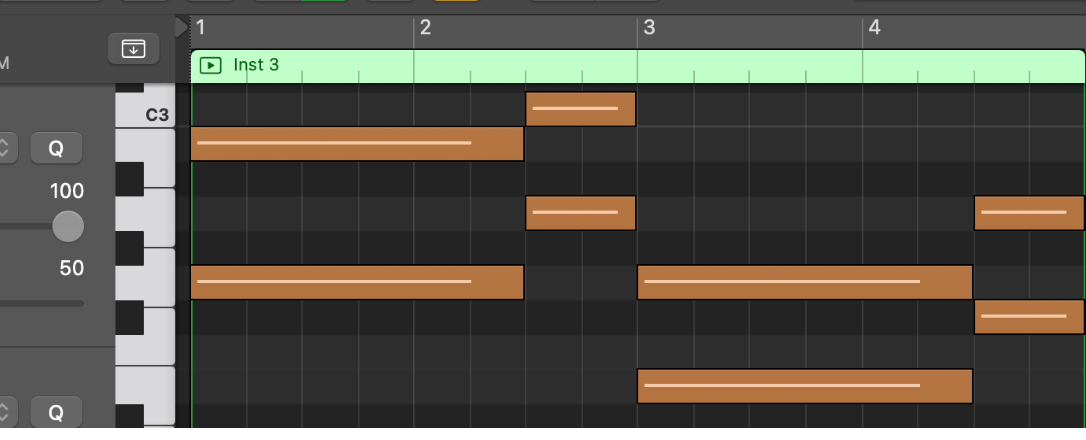
• Create a pattern like below, so the first 1/16th note is silent and vary the velocity of the 3 remaining notes in the bar as below
To have greater control of the bass line throughout the composition, if may be easier to just program in the notes as MIDI
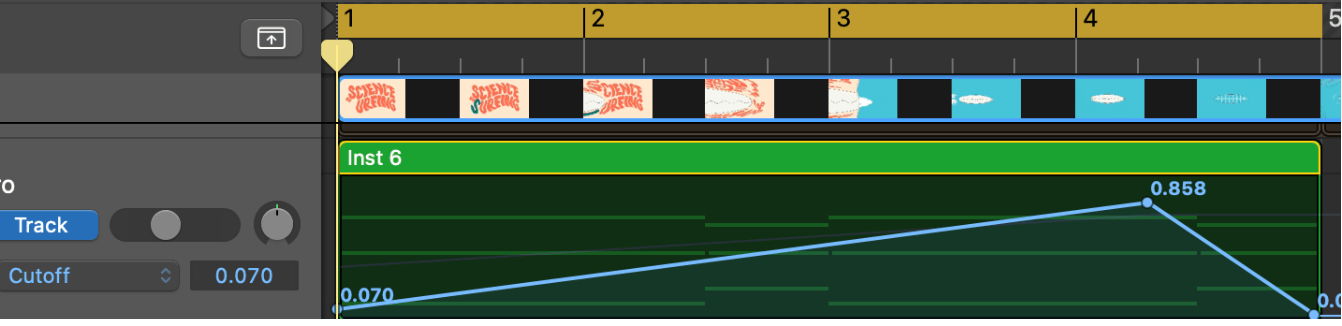
Automate Cut Off
• Go back to ES2 synth
• Hit latch and record the automation of the cut off opening and closing, or draw in
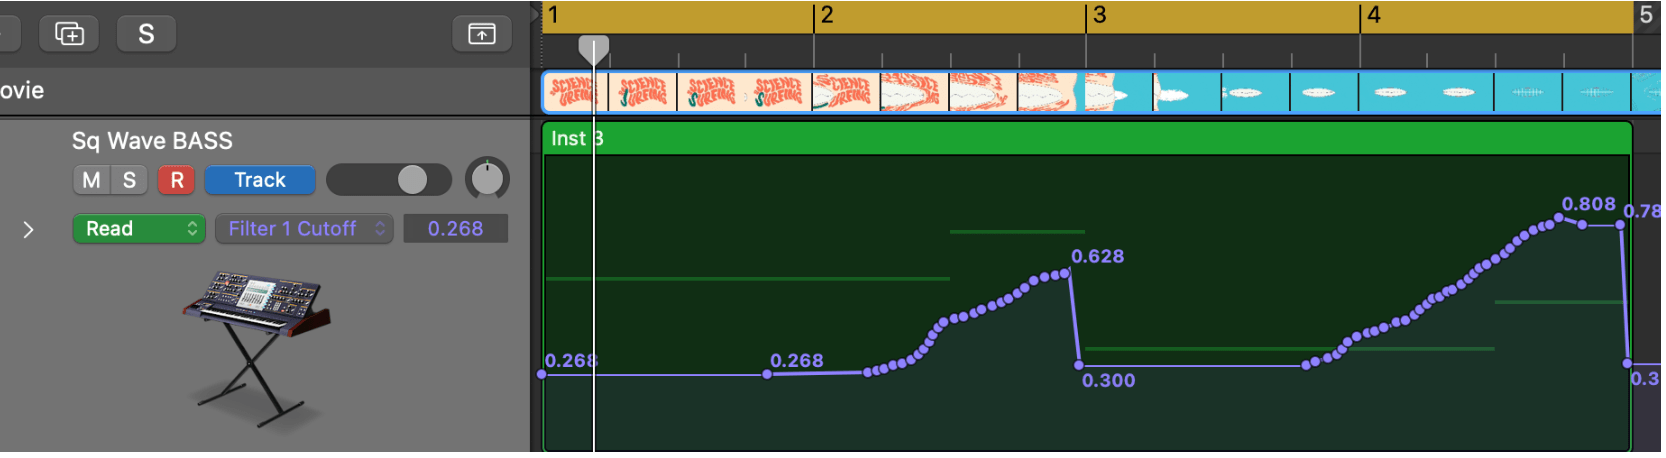
For Synthesis, used combination of square waves at different octaves and pitches (mentioned +3, -3 cents very slightly out of tune), used distortion for a grittier bass tone.
By mapping Envelope 2 with a short attack and decay and no sustain results in a percussive sound, and with the sustain set to full on Env 3, the lower pitch of Osc 1 is sustained giving a warm deep tone to support the higher octave Osc of the bass.
For Creative Effects/synthesis, Arpeggiator to trigger on the off beat notes creating a driving off beat rhythmic effect.
ES2 - Synth Pad >> Strings PWM
Create some pad chords
• Pad synths are useful to fill a track; this preset has warm combination of square waves
• Bring down Cut off 1 to approx 1/2pm
Applying LFO
• The Low Frequency Oscillator is a wave generator that creates a very low inaudible frequency (usually below 20Hz)
• It creates a rhythmic sweep/pulse and creates these effects when mapped to...
• Osc = Vibrato (change in pitch)
• Filter = Wah Wah (sweeping frequency range)
•Amplitude = Tremolo (turning volume up and down)
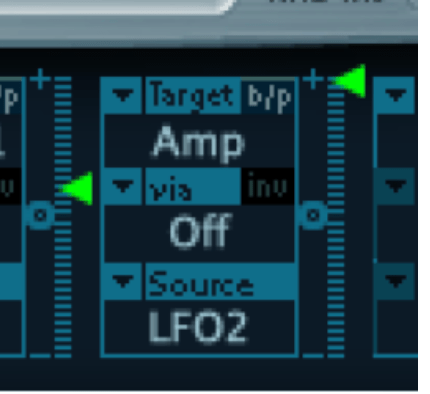
Mapping LFO
• Under Router 7, select target as AMP
• Source as LFO 2
• Bring green triangle/level up to full (to ensure you hear maximum effect)
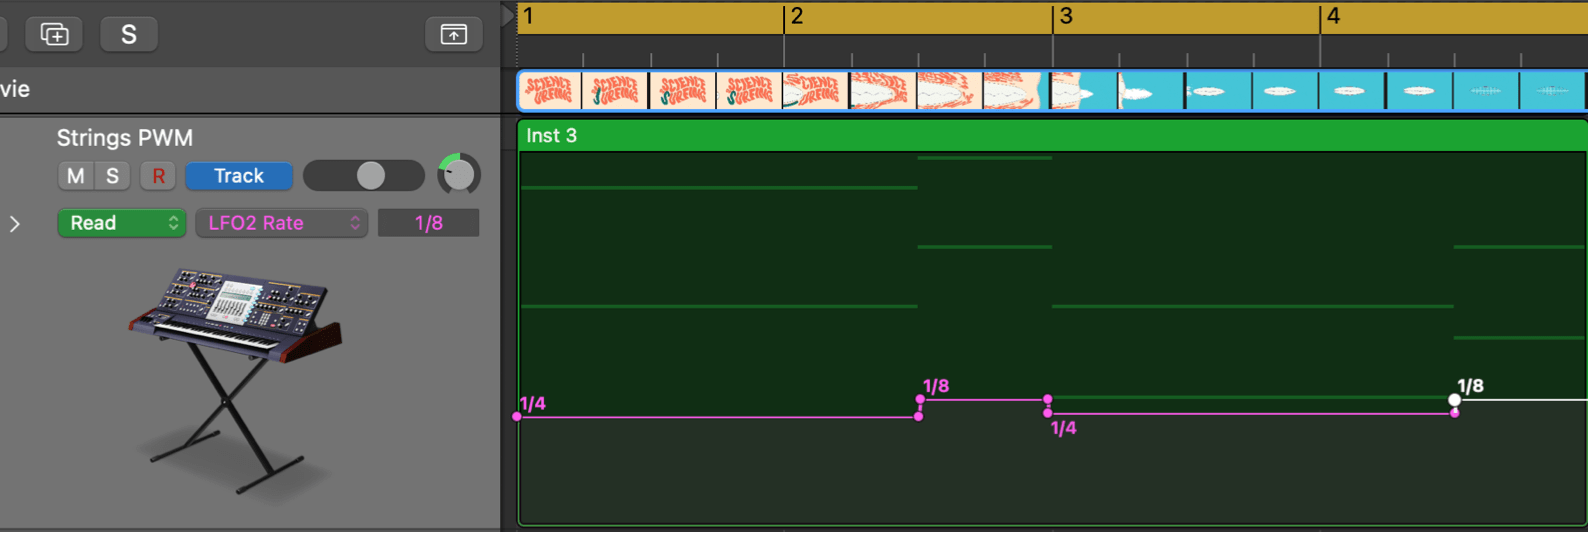
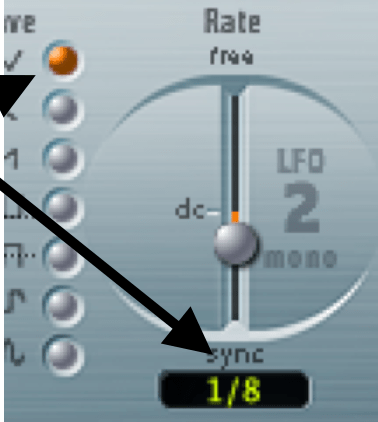
• Under LFO 2, adjust Rate to match the BPM of your piece
• 1/4 will pulse in time with the crotchets, 1/8 the quaver, 1/16 semiquaver etc, increasing the overall speed/movement of the pulse
• The wave parameter changes the shape off the LFO, try adjusting to hear the differences
• The original triangle shape at 1/8 rate is a good setting
• Try mapping target to ‘Pitch 123’ to hear extreme vibrato
• Try mapping target to ‘Cut off 1’ to hear wah-wah frequency sweep
ES2 - Default
Pluck Synth Chords
• Use short staccato off beat notes (Progressive House Style)
• This synth could be used at a different part of the song to provide variation (or could start by fading in automating the Modulation router)
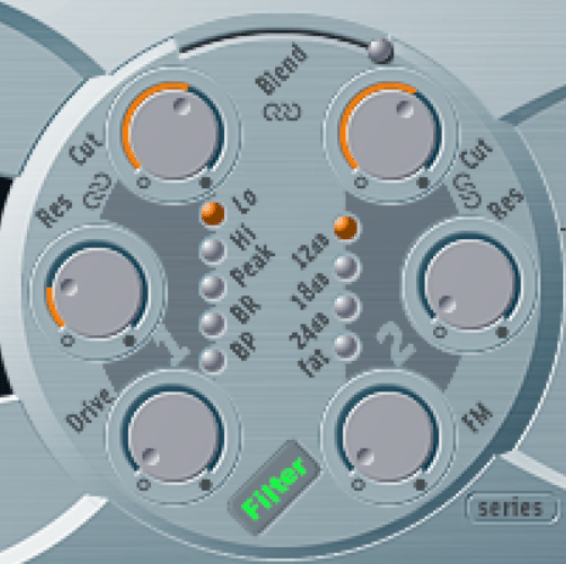
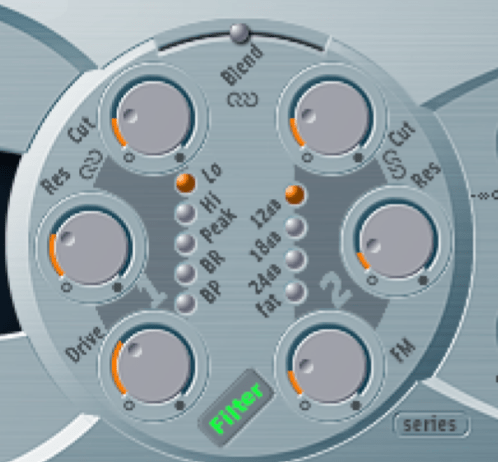
Filter
• Set BLEND to centre (so both cut offs heard)
• Adjust both Cut Offs to 9pm
• Resonance approx 9pm
• bring up FM approx 8pm
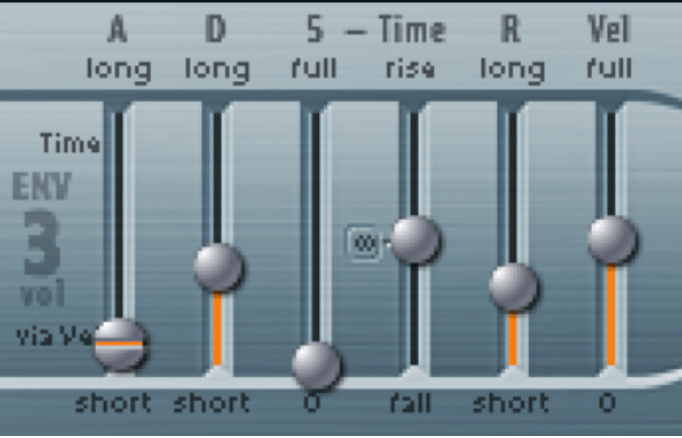
Envelope 3
Pluck is all about a short detached sound, can adjust the envelope
• Short Attack (0.48ms)
• Short Decay (approx 240ms) The short decay is key to the pluck timbre
• Sustain at 0 (again important to pluck sound)
Modulator Mapping
• Use Router 1
• Source as Envelope 3
• Target as Cut off 1+2
• Experiment with level/green triangle to listen how it affects the cut off
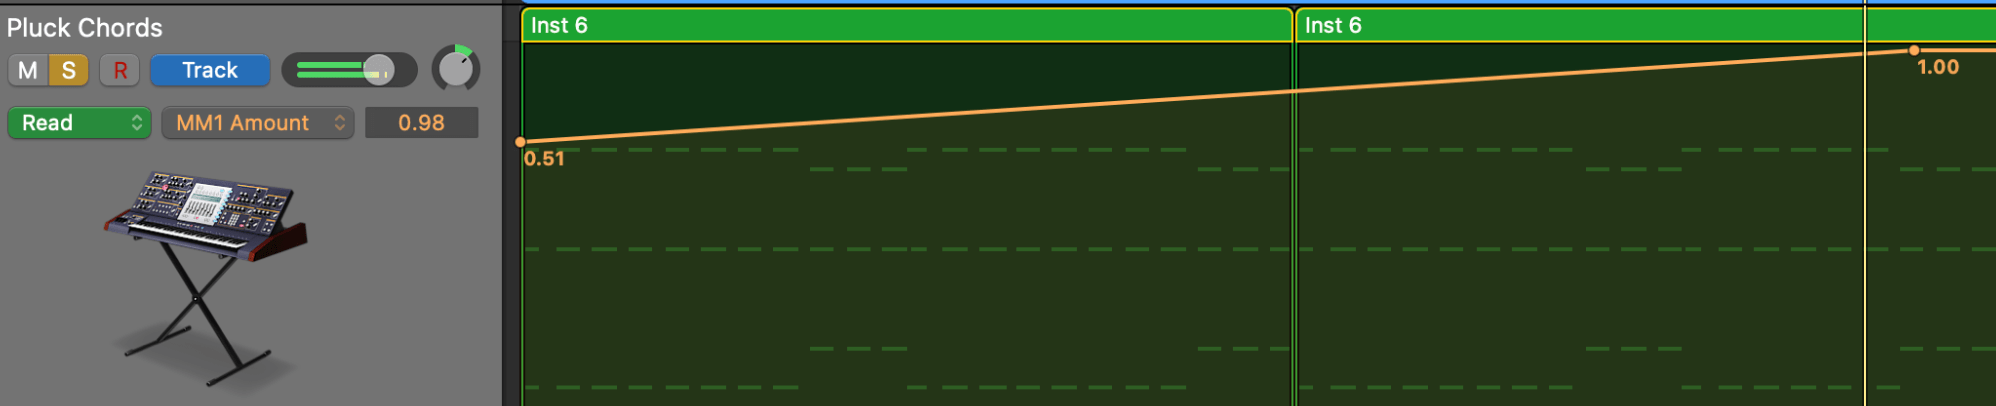
Automation
• Automate the level of the green triangle as follows (MM1 Amount)
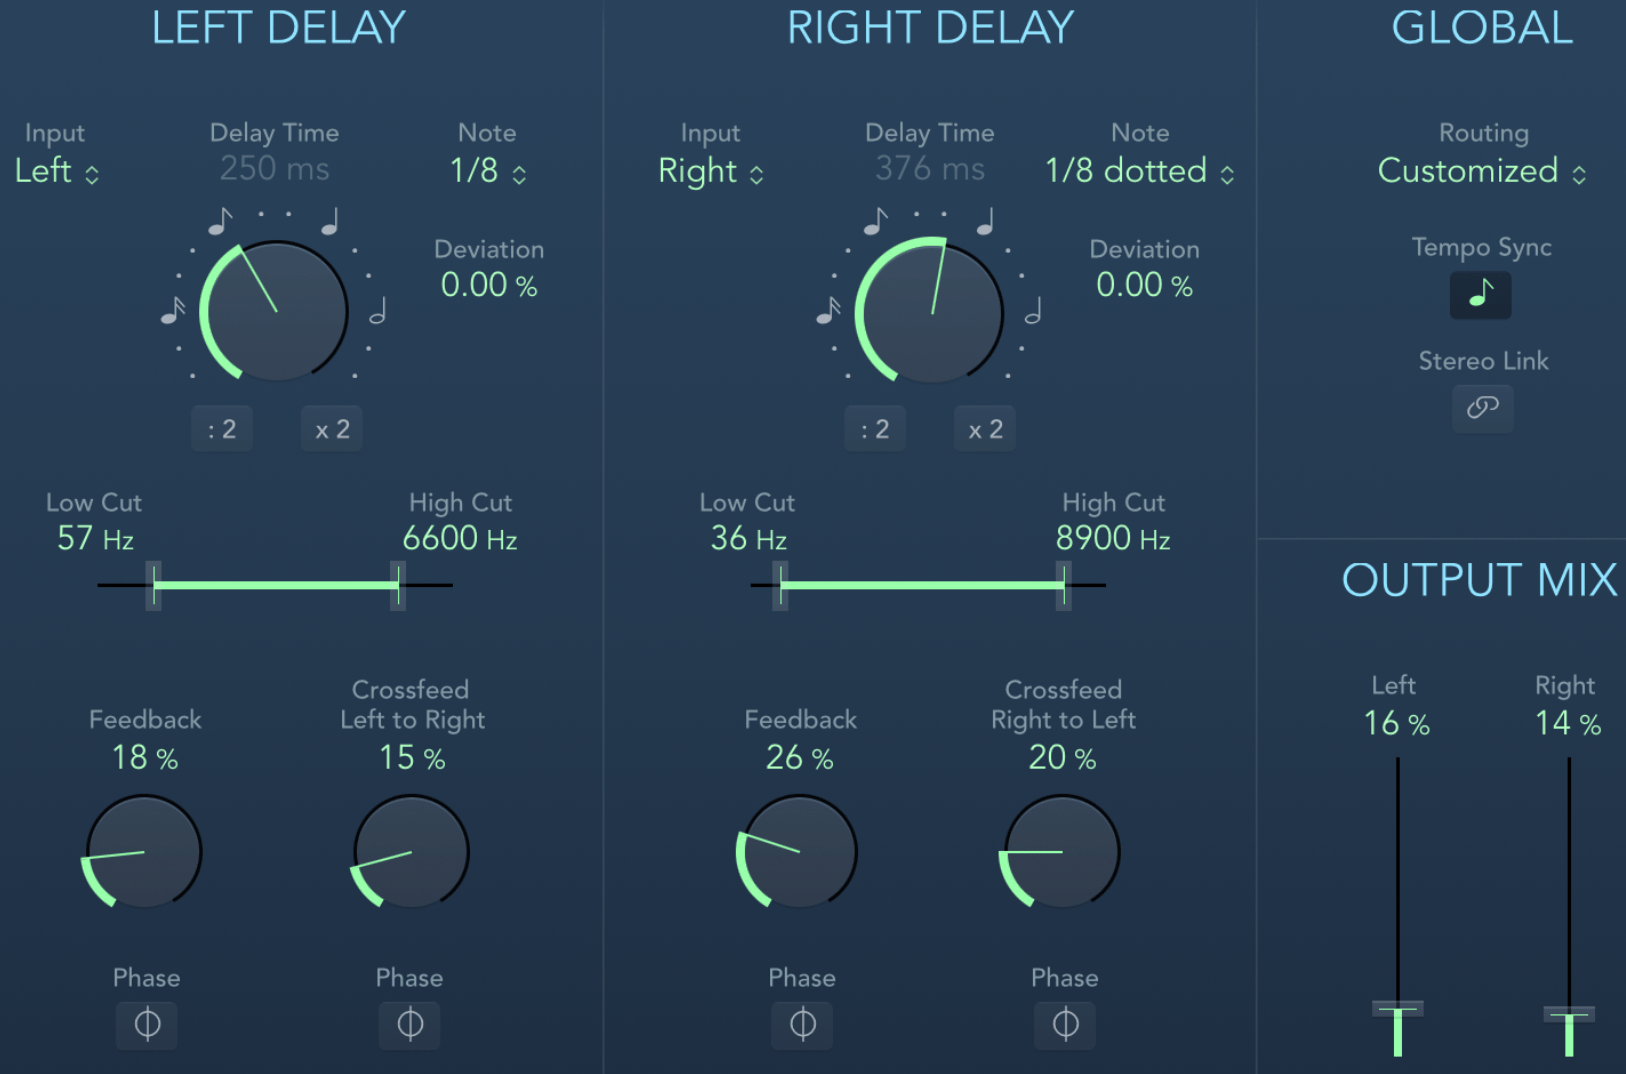
Apply Stereo Delay (as an insert)
• This will fill out the sound
• Keep the output mix low so it doesn’t muddy up the overall sound
• Set left to 1/4 and right 1/8 dotted
• Bring down the high cut to 7/8k
• Adjust feedback each side L- 15%, R-30%
• Output low
Retro Synth >> Preset Synth Bass >> Punchy Electro
Chords
• Take the chords of the Pluck Chord synth and elongate the notes
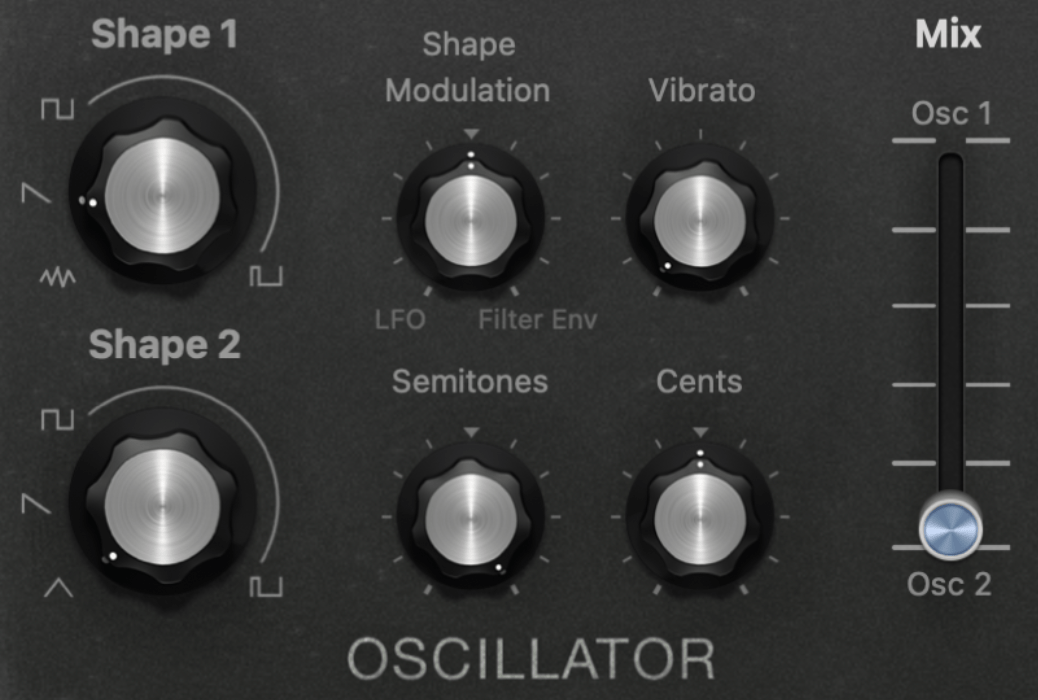
Oscillator
• Change to Triangle Wave
• Adjust Semitones +24 (2 octaves higher)
• Mix set to OSC 2
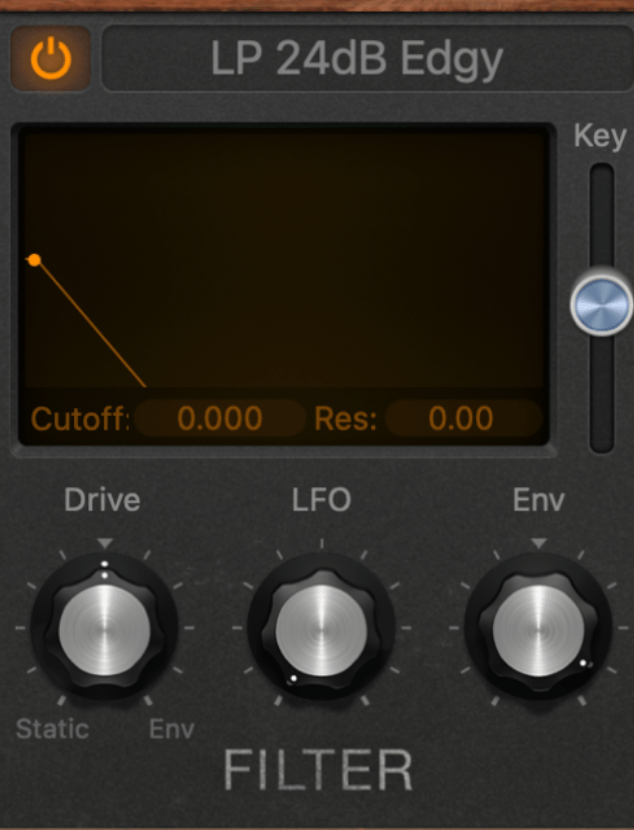
Filter
• Change to LP 24 dB Edgy
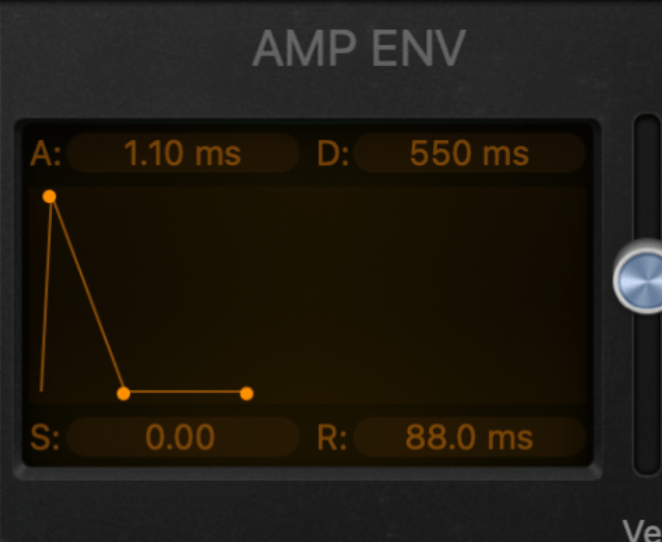
Amplitude / Envelope
• Set Attack to 1.10ms
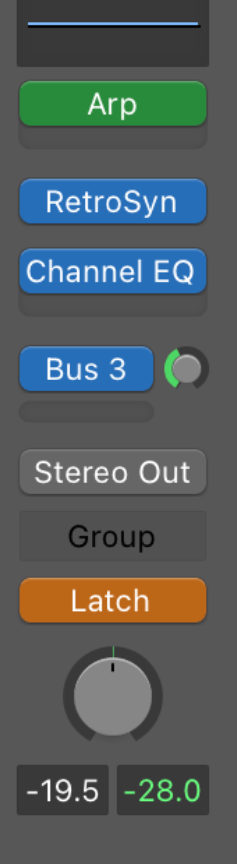
Arpeggiator
• Load ARP under MIDI FX
• Change Pattern from Live to Grid
• Adjust Velocities of notes 123 to provide variation

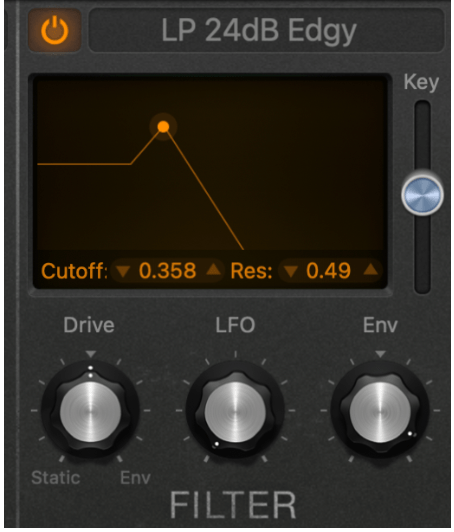
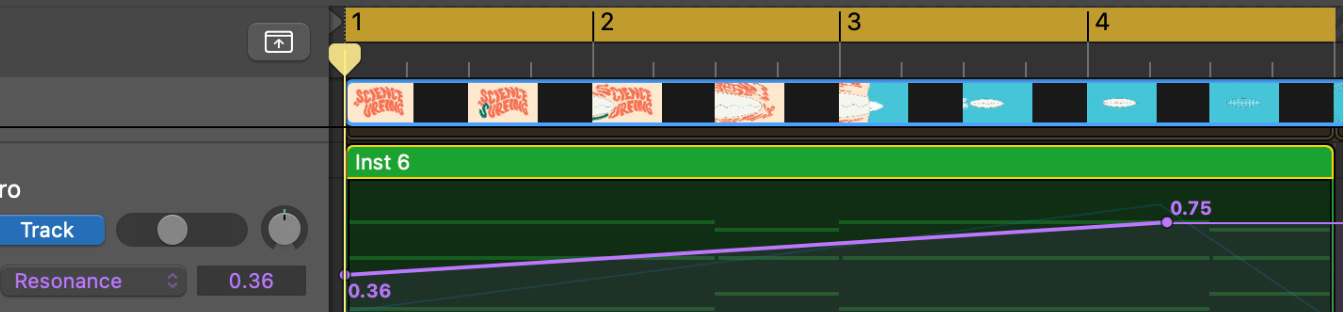
Automate Filter and Resonance on Retro Synth
• On the channel strip select LATCH
• EXPERIMENT by increasing the resonance and sweeping filter back and forth
• draw in the Automation under cut off/resonance
• Listen to the impact of the Resonance impact especially in last bar
• Try sending last bar to AUX Delay for creative effect
Draw in Automation
• Draw in the Automation under cut off/resonance
• Listen to the impact of the Resonance impact especially in last bar
• Try sending last bar to AUX Delay for creative effect
ES2 >> tutorial settings >> Analog Saw Unison
LFO synth (LFO mapped to filter)
• Use the LFO again but this time send to the filter to create a Wah-wah effect (sweeping frequencies)
• This can be used in a different section of your piece to provide variation
• To begin, create a MIDI note with one note lasting one bar
Oscillators
• 3 fat saw waves is the default
• Saw Wave = High frequency harmonics, resulting in a harsh, buzzy tone.

Filter
• Set both Cut Offs to approx 10pm
• Set blend to centre
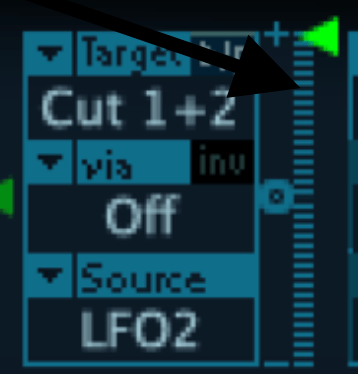
Modulator Mapping
• Use Router 4
• Source as LFO 2
• Target as Cut off 1+2
• Once LFO set up, move green fader up and down to hear impact of LFO but leave on FULL
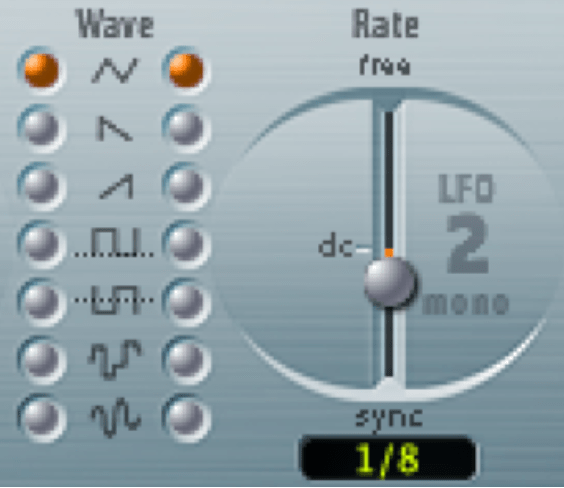
LFO
• Set RATE to 1/8 (quaver)
• Use triangle wave (default) for up and down effect
• Experiment with other waves to recognise the different effect of each wave
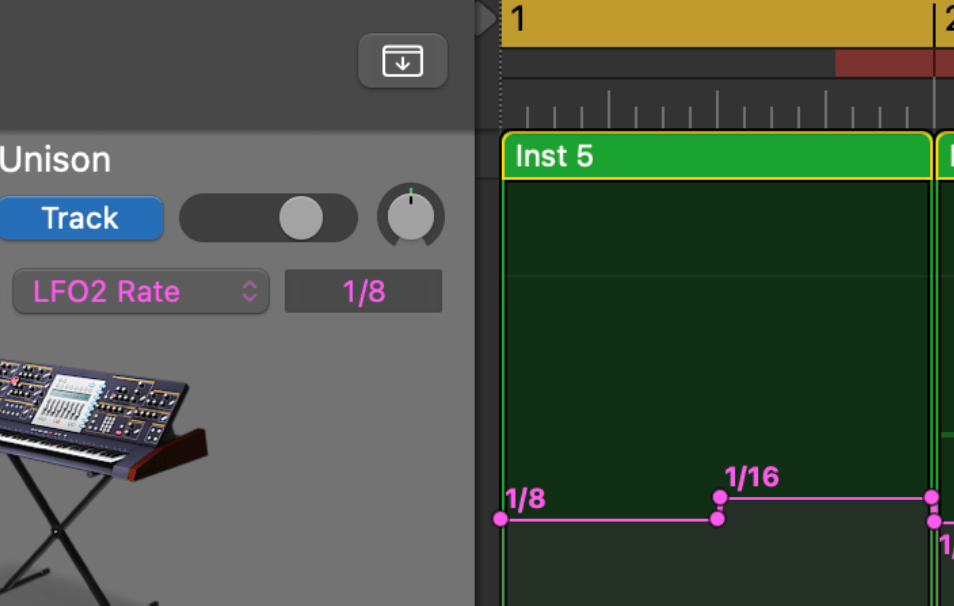
LFO Automation
• Automate the RATE of the LFO to change from 1/8, to 1/4 (slower) or 1/16th (faster) to create movement
Volume Envelope (ADSR)
• Only bring down Sustain to 0
• Leave remaining settings as is
EVOC 20 Vocoder Synth
Presets >> 02 Vintage Vocoder >> Clear Voice Vocoder
Audio Time Stretching
Record/use TTSfree.com to generate and download audio or use AI
This sample is "Smash the Speakers" from provided sample pack
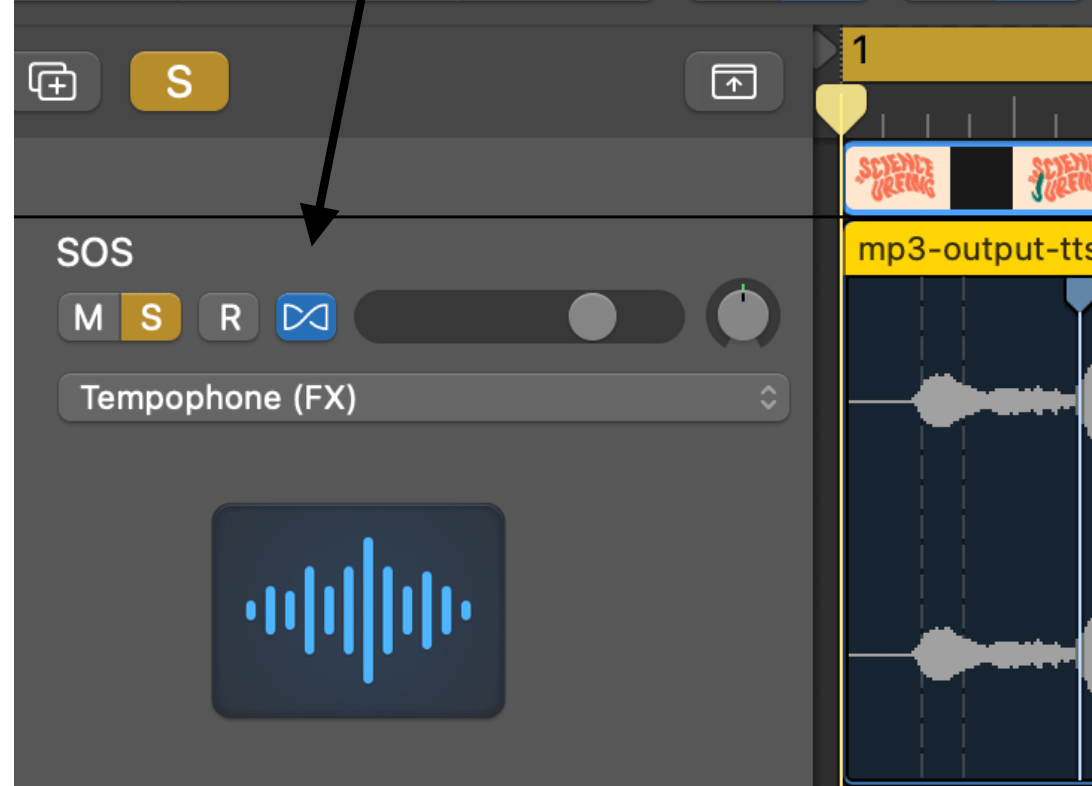
• Import vocal Audio onto track
• Turn on Flexpitch and select Tempophone (FX)
• Using the locators on the audio track, drag to stretch how you want the syllables across 2 bars; it will sound stretched
• Mute the track
Vocoder Synth
• Create a new software instrument track with EVOC 20 PS Vocoder Synth
• Copy and Paste the chords from the ARP synth or make new chords/melody
• Go Presets >> 02 Vintage Vocoder >> Clear Voice Vocoder
• Like Side Chain compression, you want to send the vocal audio signal to the Vocoder synth; set the the Analysis Input to your audio track
• Ensure original audio track is muted so you can only hear Vocoder
• When using Vocoder with audio signal, you must set the signal on the Vocoder synth as Voc
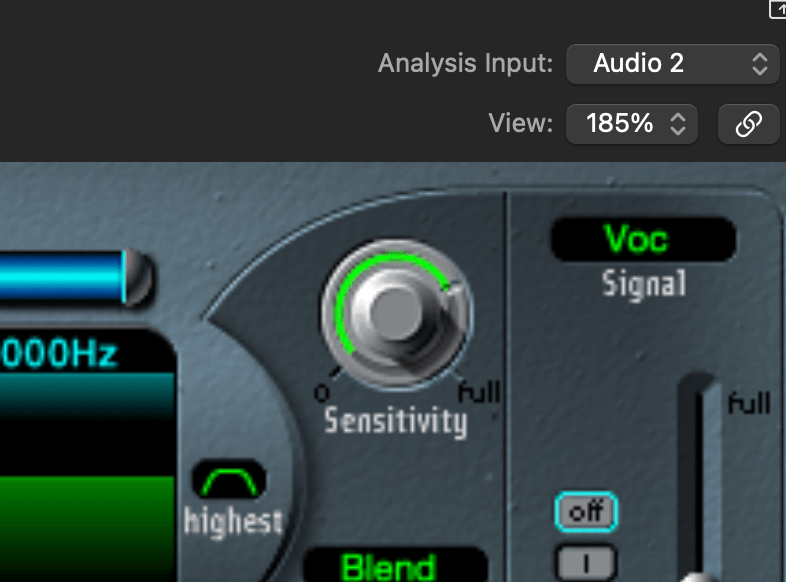
• You should now have the classic Robotic Vocoder effect
• Another good preset is >> 02 Vintage Vocoder >> Atmospheric Pad
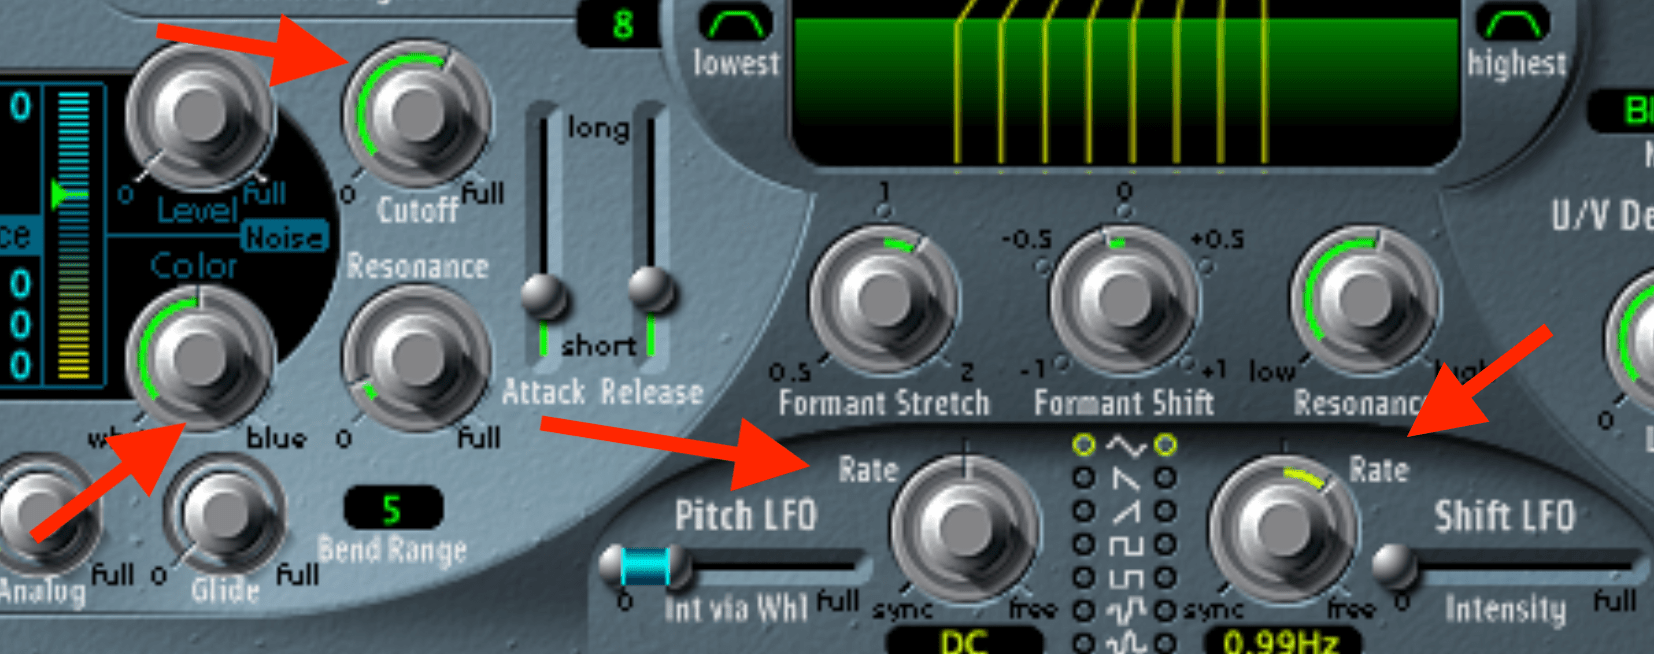
Vocoder Settings
• There is a lot going on in this synth so let’s just look at the main settings to ensure you understand their function
Bands (5 to 20)
• Chops the vocals into multiple frequency bands helping the vocoder better analyse and recreate the signal; the more bands (20) = more realistic, the less bands (5) = more digital/ processed
• Set to both extremes so you can hear the difference
Formants Stretch
• You can bring the Formants closer together or spread them out
• Bringing down to 0.5 will result in a tighter sound but quality will sound digital/too processed
• Turning right up to 2.0 will result in a more open clearer sound

Formants Shift
• Creates deeper or higher sound without affecting the pitch
Further Vocoder Settings
Remember this is a synth; you still have the Oscillator, Filter, LFO to adjust
Automation
• Try automating the main settings or LFO
• You may want one part to sound more digitised and become gradually clearer
EXPERIMENT